TABLE OF CONTENTS
- Create an Ultra Document
- Ultra Document Block Types
- Add Media to your Document
- Block Styling Options
- Create a Document Layout: Edit, Resize, and Move Blocks
Create an Ultra Document
An Ultra Document lets you present a variety of content—text, images, video, attachments, links, Knowledge Checks, and more—all in one place. You can use it to build rich course materials by combining multiple visual and textual elements into a single, streamlined item. Ultra Documents are built with flexible block types, giving you control over layout, design, and how your content is displayed.

To create an Ultra Document, click on the + button anywhere on your Course Content page, within a Learning Module, or within a Folder. Select Create and then select Document.

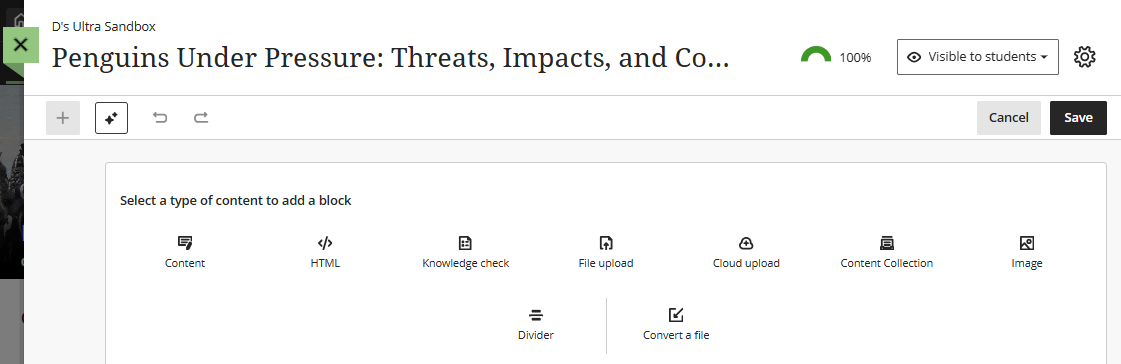
Give your Ultra Document a name, set the visibility status, and select the type of content block you wish to add.
Content blocks allow you to design Ultra Documents by adding different types of content. There are several different block types to choose from, but the most frequently used are Content, Image, File Upload, and Knowledge Check. Refer to Ultra Document Block Types for more information.
You may design your Ultra Document with one block or create several different blocks. Once you have created a block, click the plus sign (+) above or below the block to create another block.

As you create blocks, you can create a visually appealing layout by resizing and moving your blocks into columns and rows.
Ultra Document Block Types
Content block
The Content block is the most common (and familiar) block type. Content blocks utilize the text/content editor so that you may add and format text, insert web links, upload file attachments, add images, embed media, etc.

Image block
The Image block allows you to upload an image from your computer, add royalty-free images from Unsplash (instructor only), or use AI to generate an image (instructor only). You will have the options to change the aspect ratio and reposition the image, add a caption, and add alt text or mark the image as decorative.

File Upload block
The File Upload block allows you to upload a file from your computer. You may select whether students can view, download, or both view and download your file.

Important: Do not upload media files (ex mp3, mp4, mov) via the File Upload block. Instead, create a Content block and use the text/content editor to add media content.
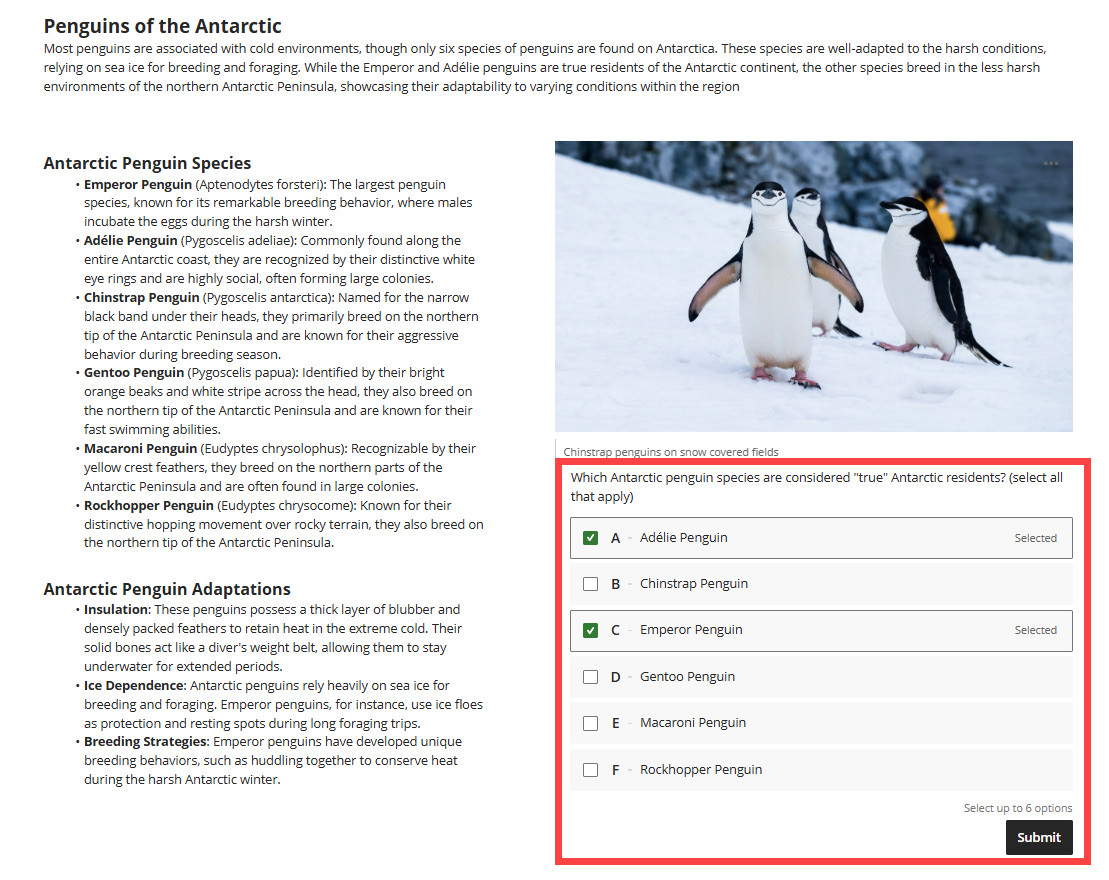
Knowledge Check block
The Knowledge Check block allows you to create multiple choice and multiple answer questions for students to engage with and receive immediate feedback.
Watch the Knowledge Checks in Blackboard Documents video tutorial for more information.
You may also use Blackboard's AI Design Assistant to generate Knowledge Checks based on the content in your Ultra Document. Refer to the Generate Knowledge Checks in Documents support page for more information.
HTML block
The HTML block allows you to add HTML content, such as an embed code for a video.

Cloud Upload block
The Cloud Upload block will prompt you to login to a cloud service (OneDrive, Google Drive, Dropbox, or Box) and select a file. You may select whether students can view, download, or both view and download your file. Refer to the Upload Cloud Storage Files to myLesley support article for more information and detailed instructions.
Content Collection block
The Content Collection block will allow you to search your course's Content Collection and select a file. You may select whether students can view, download, or both view and download your file. Refer to the Content Collection Files support article for more information and detailed instructions.
Divider block
The Divider block allows you to add a resizable divider between blocks.
Convert a File block
The Convert a File block allows you to select a file from your machine and convert it into an Ultra Document. Supported file types include PDF, PowerPoint (ppt, pptx, pps), and Word (doc, docx, odt).
Add Media to your Document
The best way to share media (audio and video) with your students will depend on whether it is media you have created or media that others have created.
Media You Created (Kaltura Media)
To share media you have created, including recorded lectures or narrated presentations, upload your media to myLesley via Kaltura Media.
Kaltura provides a lot of advantages, both to you and your students, including:
- Compatibility: Kaltura will accept a large amount of media types and automatically convert it to versions your students can view, regardless of their device.
- Accessibility: Kaltura will automatically caption your media content. Accurate captioning of audio and video content ensures that people who are Deaf and hard of hearing can understand your content. Additionally, captions are very useful to non-native English speakers, viewers watching in a sound-sensitive environment such as a library, can help viewers with learning disabilities or attention deficits maintain concentration, and can help all learners improve comprehension.
- File Size: Students do not have to download content. Instead, the media is hosted on Kaltura's servers and streams through myLesley. Additionally, uploading your media to Kaltura does not impact your overall course file size (all courses have a 5 GB data limit and communities have a 50 MB data limit).
- Privacy and Security: Kaltura content cannot be downloaded by anyone who is not the owner, nor can they be shared on other websites.
To share your media, create a Content Block. Then, using the Text/Content Editor, click the Insert Content (+) button. This will open a menu. Select Content Market.

This will take you to your Kaltura My Media, where all of your Kaltura media is stored. From here, you may upload new media, embed media you uploaded previously, or record new media.

For more information and detailed instructions, refer to:
- Upload media to myLesley via Kaltura Media
- Record a Presentation and Share it in myLesley via Kaltura Media
- Use Kaltura Media Express Recorder to quickly record your webcam or screen
- Kaltura Media: Captioning Video Content
Media Created by Others
If you are not the creator of the media or do not have permissions from the publisher, you cannot upload the media into your course or into Kaltura Media. This includes copies of DVDs that you have purchased. If the content exists on the web (ex YouTube, Vimeo, PBS, library media databases), you may either link to it or embed it in your course.
Link to Online Media
To link to your online media, create or edit a Content Block. Then, using the Text/Content Editor, click the Insert/Edit Link button.

Enter or paste the link URL and add the link text. When creating a link we recommend that your link text clear and accurate information about the destination. For example, instead of linking to the text Click here, include the full title of the destination page, such as Lesley Support Hub.

Embed Online Media in a Content Block
You may easily embed your online media in a Content Block. Using the Text/Content Editor, click the Insert Content (+) button. This will open a menu. Select Embed Media.

This will open a window. In the Media URL area, paste the URL of your media. In the Alternative Text area, add some information about your media. Then, click Insert to insert your media.

Your media will be centered in your Content Block along with any other content. You may select your media to resize, but you cannot align it to the left or right of the content block.

If your media is unable to display inline, you will see a message saying "Media isn't supported from this URL." If this happens, you will need to add a link to your media.

Embed Online Media with an HTML Block
If you have access to an embed code, you may embed your media using a HTML block. Create your HTML block and paste the embed code.

Your embedded media will appear as its own block within your Ultra Document. You may then resize and move the block around the page.

Block Styling Options
Use block styling to enhance the visual appeal of your Ultra Documents and guide students' attention to key ideas, questions, next steps, and more.
When creating or editing an Ultra Document, click on the Styling button (paint palette icon) to open a menu. Select the styling option you wish to use.

You may select from the following styling options:
- Question (question mark icon): Use for prompts or reflective questions. Keep questions concise and open-ended to encourage critical thinking.
- Tip (light bulb icon): Use for tips, insights, or helpful suggestions. Ensure tips are actionable and relevant to the content.
- Key Points (pin icon): Use to highlight key points or essential facts. Keep these blocks brief and focused to reinforce retention.
- Next Steps (chevrons icon): Use for next steps or instructions. Present steps in a clear, logical order and consider using numbered lists for clarity.

Create a Document Layout: Edit, Resize, and Move Blocks
If you create multiple blocks, you can create a more visually appealing layout by resizing and moving them into columns and rows.

Select a block to move and reposition it on the page. You may move blocks to create rows or stack them in columns.
You may also use Blackboard's AI Design Assistant to update and format the layout of your Ultra Document by breaking your content into blocks, applying headings, adding images, and even adding an embedded Knowledge Check.
From within your Ultra Document, click the Edit Content button to switch to edit mode. Then click the Generate Document Layout button.
Refer to the Generate Ultra Document Layout support page for more information and detailed instructions.
Was this article helpful?
That’s Great!
Thank you for your feedback
Sorry! We couldn't be helpful
Thank you for your feedback
Feedback sent
We appreciate your effort and will try to fix the article